Create New School Year- School Year Setup>>New
- School Year
Create New Year - ie. 25-26
Start - ie. (2009) End Year ie (2010)
NO NOT make Active
Start Date - ie. (07/01/xxxx) End Date - ie. (06/30/xxxx)
School Year - select old school year from Drop Down - (CLICK) Load Preference Form Previous Year
Create New Year - ie. 25-26
Start - ie. (2009) End Year ie (2010)
NO NOT make Active
Start Date - ie. (07/01/xxxx) End Date - ie. (06/30/xxxx)
School Year - select old school year from Drop Down - (CLICK) Load Preference Form Previous Year

**MAKE NEW YEAR ACTIVE - SYSTEM ADMIN/CALENDARS/SCHOOL YEARS - uncheck to make inactive - check to make new active
(Before you make your New Year Active - Change Your Portal Access) Portal-Preferences
Make sure to uncheck: Schedule/Attendance/Grades
Search Groups: Teacher/Coach-Sponsor/Sped Lead Teacher and add previous school year to Calendar Rights to prevent access to new school year.
Calendar
-Calendar Wizard
--create new calendars by rolling forward selected data
Year (ie. 09-10)
Enter Start Date
Enter End Date
Select the Schools you want (All Except HS and MS)
Click - Next
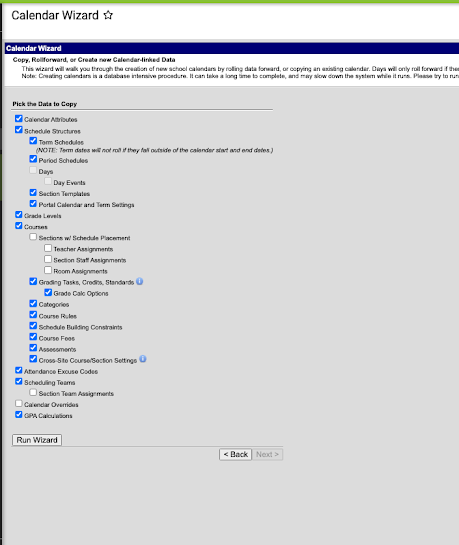
Pick DATA to Copy
Select -
Check ALL BOXES - Except for Days, and Days Events and Calendar Over-rides
Run Wizard
Scroll To Bottom and See Complete
For MS,
Check ALL BOXES - Except for Days, and Days Events and Calendar Over-rides, Sections w/Schedule Placement, Teacher Assignments, Section Staff Assignments, Room Assignments
Run Wizard
Scroll To Bottom and See Complete
For HS,
Check ALL BOXES - Except for Days, and Days Events and Calendar Over-rides, Sections w/Schedule Placement, Teacher Assignments, Section Staff Assignments, Room Assignments, Section Team Assignment
Run Wizard
Scroll To Bottom and See Complete
Log out and log back in to see the new calendar or RELOAD
For User Access For Users-Go to Group - Select Each School - and CHange the Calendar rights - for the current year --
Make Sure they have access to current year.
Change Year
-Calendar - calendar
change name - ie. 09-10 CES
SAVE
Terms - Change Term Dates to be the new terms
Periods - Click period schedules - Main 1 - or Main
Make Sure Period info is set correctly
Days -Click Day Reset -- Select all except. Sat. and Sun.
Create Days --
For HS - AFTER you do the Day Reset, you MUST click on DAY ROTATION (as long as they have MTWRF schedules)
Follow the image below. Then Click Assign Rotations.

Then Set Holidays, etc. - - Day Event Type- select Holiday from Dropdown SAVE - OK
To copy Calendar Holidays
-Calendar Wizard
--Copy Data into Existing Calendars
Pick Source Calendar - the Calendar you changed
Pick Destination Calendars
Select Copy Mode - Copy/Append (Elementary Schools - Select Terms/Days)
Select Boxes - Days and Day Events
Run Wizard
TO ROLL STUDENTS FORWARD
Search Tools for Enrollment Roll- Enrollment Roll Forward Wizard
- Pick High School
- Pick 9, 10, and 11 (middle school 8th only)
- Select Primary Source Service Type
Select Source structure Main
Select Start Status C continuing in same school
(8th grade will be U Transferred/Promoted)
Dest. Calendar new year
Select. Dest. Struct. Main
Start Date Select First Instructional Day
Select Destination Grade (only 5th to 6th or 8th to 9th)
Select Totals only
Select Show Warnings
Run Test
Run
To remove Skinny Structures or delete a course
Find Course
Scheduling Rules - Delete Rules
Composite Grading Clear (if rolled up)
Grading Task - Clear
If you want to use the course later UNCHECK ACTIVE - SAVE
Otherwise - - Delete Course
BEFORE New Calendar Set Up Make Sure to Removed Retained but don't do it until after Fall FTE count
At the end of the year-
Student Enrollment Cleanup (Wait Until Student Record is DONE)
Enrollment Clean-up- before you do the enrollment end batch (select - for all grades) and select (primary box)
Enrollment End Batch- (DO BEFORE STUDENT RECORDS)
Select 12 grade
Select End Date
Select G for Graduation for End status
Enter Diploma Date RUN
NOTE IMPORTANT - DO DAYS ROTATION - BY DAYS OF THE WEEK - to set - Calendar/Calendar/Periods
-During Scheduling (while using schedule wizard) - set days to [Monday, Wednesday, Friday, Tuesday, Thursday]
-Before Schedules are printed -set days to (Monday, Tuesday, Wednesday, Thursday, Friday]
To let Students enter Schedule Requirements
Go To Courses
Check --Allow Requests only for courses you want students to be able to request.
Enable Teacher access for requests Do new Group Teacher Course Requests create group
Tool Rights - instruction Teacher Course Requests all SAVE
Go to School set tool rights for Teacher course requests
Check --Allow Teacher Requests (do this in Current Year)
click on Scheduling Rules
Select Rule preceeds
Select Next Course in Sequence
Set any other new rules by adding new rules
Disable Student Portal Schedule Option
System admin - resources resourse
Portal options disable
To Set WALK-IN SCHEDULE for teachers to enter student requests during Advisement
Student Information General Schedule Check Read and Write
Create Counseling Group
Counseling Check all boxes (all counselors and Social Worker)
Remove Counseling Off of Scheduling Group
AGAIN: NOTE IMPORTANT - DO DAYS ROTATION - BY DAYS OF THE WEEK - to set - Calendar/Calendar/Periods
-During Scheduling (while using schedule wizard) - set days to [Monday, Wednesday, Friday, Tuesday, Thursday]
-Before Schedules are printed -set days to (Monday, Tuesday, Wednesday, Thursday, Friday]
**MAKE SURE TO ROLL FORWARD REPORT CARDS and Transcripts**
System Admin - Preference - Reports
**Roll emails and anything for Mastery Connect
No comments:
Post a Comment
Note: Only a member of this blog may post a comment.