Do this so that kids cannot see their schedule.
To disable SLDS- you will need to go to Index> Sys Admin> Custom > Custom Tab>SLDS Portal > Uncheck the publish to Portal box> Save
Tuesday, June 30, 2020

Thursday, June 18, 2020
Smart Fusion Hosted Instructions
Smart Fusion Hosted Instructions
For a Mac
1. In any browser, navigate to this address (please bookmark it as Smart Fusion) https://smartfusion2.harrisschool.solutions/rdweb/webclient/index.html
2. Enter this for the user and password
User: franklinfirstinitiallastname (for example, franklintsmith)
Password: ChangeMe!
3. You will receive a message that includes “Click here to change your password” Click that link
Domain Username: CUSTOMER\franklinfirstinitiallastname
(for example, CUSTOMER\franklintsmith)
Current Password: ChangeMe!
New Password: FClions!
Confirm Password: FClions!
Click Submit
It will say your password has been successfully changed. Click OK
(If prompted to save this password, please do so)
4. You will be taken back to the main page. Log in with the username and the FClions! password.
5. You will come to a page with an icon named Smart Fusion Franklin BOE. Click that icon
6. It should then connect and show you the same gray login box that users have seen before. The same username and password that they have previously used to login to the application will still work here.
For a Windows Machine
(please bookmark it as Smart Fusion)
2. Click on the link to Install Harris School Solution Hosting for Windows
3. Install that icon to the desktop.
4. Then click on that icon and follow steps 2-6 from above
Make sure to remove the old icon from PCs and the Remote Desktop icon from Macs.
Tuesday, February 4, 2020
CUPS Print Settings
CUPS (formerly known as Common UNIX Printing System), is a network
printing system that allows Mac OS devices to connect to various
printers on a network.
As the CUPS Web Interface may be disabled by default on your Mac, you will need to enable it.
To do this, you will first need to visit:
http://localhost:631/printers/
If you get a message stating that the interface is disabled, you will need to open the Terminal and run this command
cupsctl WebInterface=yes
Hit Enter
Now you can try going to the CUPS menu (above) again.
As the CUPS Web Interface may be disabled by default on your Mac, you will need to enable it.
To do this, you will first need to visit:
http://localhost:631/printers/
If you get a message stating that the interface is disabled, you will need to open the Terminal and run this command
cupsctl WebInterface=yes
Hit Enter
Now you can try going to the CUPS menu (above) again.
Friday, January 3, 2020
Planbook View Only
Teachers may get a view only if they happen to be signed into Google Chrome web browser.
Allow chrome sign-in must be turned off for planbook to pull up correctly.
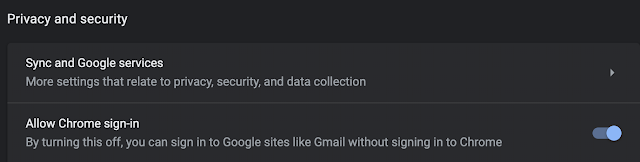
Allow chrome sign-in must be turned off for planbook to pull up correctly.

Remote Management on iPads

Remote Mangement Cannot Connect to Server

To fix this issue, you have to find the serial number and unassign the device from Apple School Manager.

Wednesday, December 18, 2019
Videos Won't Play in Drive Preview
chrome://settings/content/cookies
Turn off block 3rd party cookies
Turn off block 3rd party cookies
Monday, August 19, 2019
New Smart Fusion for RD10
For Remote Desktop 10.
Download the Remote Desktop 10 from the App Store
Before adding, the user account must be edited in Active Directory (see Andrew for this)
On the Environment Tab, check the first box
paste this: C:\Program Files (x86)\CSI\SmartFusion\csiwinforms.exe
then this: C:\Program Files (x86)\CSI\SmartFusion
Click Apply

Add the Remote Desktop App
Add a Desktop
Add 10.10.1.7 as PC Name
Add User Account (csidp\username, password, name it Smart Fusion)- Click Add
Make sure to check the box for printing (see pic)

Download the Remote Desktop 10 from the App Store
Before adding, the user account must be edited in Active Directory (see Andrew for this)
On the Environment Tab, check the first box
paste this: C:\Program Files (x86)\CSI\SmartFusion\csiwinforms.exe
then this: C:\Program Files (x86)\CSI\SmartFusion
Click Apply

Add the Remote Desktop App
Add a Desktop
Add 10.10.1.7 as PC Name
Add User Account (csidp\username, password, name it Smart Fusion)- Click Add
Make sure to check the box for printing (see pic)
Subscribe to:
Posts (Atom)