CUPS (formerly known as Common UNIX Printing System), is a network
printing system that allows Mac OS devices to connect to various
printers on a network.
As the CUPS Web
Interface may be disabled by default on your Mac, you will need to
enable it.
To do this, you will first need to visit:
http://localhost:631/printers/
If you get a message stating that the interface is disabled, you will need to open the Terminal and run this command
cupsctl WebInterface=yes
Hit Enter
Now you can try going to the CUPS menu (above) again.
Tuesday, February 4, 2020

Friday, January 3, 2020
Planbook View Only
Teachers may get a view only if they happen to be signed into Google Chrome web browser.
Allow chrome sign-in must be turned off for planbook to pull up correctly.
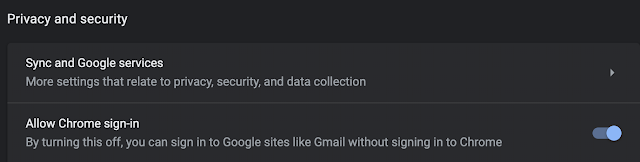
Allow chrome sign-in must be turned off for planbook to pull up correctly.

Remote Management on iPads

Remote Mangement Cannot Connect to Server

To fix this issue, you have to find the serial number and unassign the device from Apple School Manager.

Wednesday, December 18, 2019
Videos Won't Play in Drive Preview
chrome://settings/content/cookies
Turn off block 3rd party cookies
Turn off block 3rd party cookies
Monday, August 19, 2019
New Smart Fusion for RD10
For Remote Desktop 10.
Download the Remote Desktop 10 from the App Store
Before adding, the user account must be edited in Active Directory (see Andrew for this)
On the Environment Tab, check the first box
paste this: C:\Program Files (x86)\CSI\SmartFusion\csiwinforms.exe
then this: C:\Program Files (x86)\CSI\SmartFusion
Click Apply

Add the Remote Desktop App
Add a Desktop
Add 10.10.1.7 as PC Name
Add User Account (csidp\username, password, name it Smart Fusion)- Click Add
Make sure to check the box for printing (see pic)

Download the Remote Desktop 10 from the App Store
Before adding, the user account must be edited in Active Directory (see Andrew for this)
On the Environment Tab, check the first box
paste this: C:\Program Files (x86)\CSI\SmartFusion\csiwinforms.exe
then this: C:\Program Files (x86)\CSI\SmartFusion
Click Apply

Add the Remote Desktop App
Add a Desktop
Add 10.10.1.7 as PC Name
Add User Account (csidp\username, password, name it Smart Fusion)- Click Add
Make sure to check the box for printing (see pic)
Wednesday, July 3, 2019
Adding Office 2019 to PCs
Get the Office Deployment Tool from Andrew or download it
You will also need a file that Andrew has called the Office2019_File.xml
Run the ODT
Accept the License Agreement
Extract it to a Folder you name ODT in the C:Drive
Add the Office2019_File.xml to this new ODT folder
Search for Command Prompt
Right click and Run as Administrator
For the first prompt, type
cd\
Hit Enter
Then type
cd odt
Hit Enter
Then type
setup download Office2019_File.xml
Hit Enter
Then type
setup /configure Office2019_File.xml
Hit Enter
Office should begin to install now.
You will need to enter the code

You will also need a file that Andrew has called the Office2019_File.xml
Run the ODT
Accept the License Agreement
Extract it to a Folder you name ODT in the C:Drive
Add the Office2019_File.xml to this new ODT folder
Search for Command Prompt
Right click and Run as Administrator
For the first prompt, type
cd\
Hit Enter
Then type
cd odt
Hit Enter
Then type
setup download Office2019_File.xml
Hit Enter
Then type
setup /configure Office2019_File.xml
Hit Enter
Office should begin to install now.
You will need to enter the code
VWNKD-C7YXY-D2VJD-H4HGR-Q9P7B (this is for the 13 licenses Andrew bought)

Friday, June 7, 2019

Subscribe to:
Posts (Atom)