See IC ticket number 487038 (updated 1/15/25)
Make sure the local number is in the Embedded Course blank at the bottom of the HCS course.
Create a section of Anatomy (with Melton as the teacher). Check the same section placement as the HCS course.
Copy the roster into the Anatomy course. Go to Requests and Rosters>>Choose Students>>Filter to the HCS course/section you want to copy. Click Batch Edit Student Rosters. Find the Anatomy course and then choose the correct section in the dropdown. Click Add.
Ga State Reporting> Embedded Course Processes>>Run the Pull and then the Push
Tuesday, June 7, 2016
Thursday, May 19, 2016
Franklin-Chromebook-Questions-Responses-v1
A student can delete a account (Gavin (another tech) said there was no way to change this). Is this true?
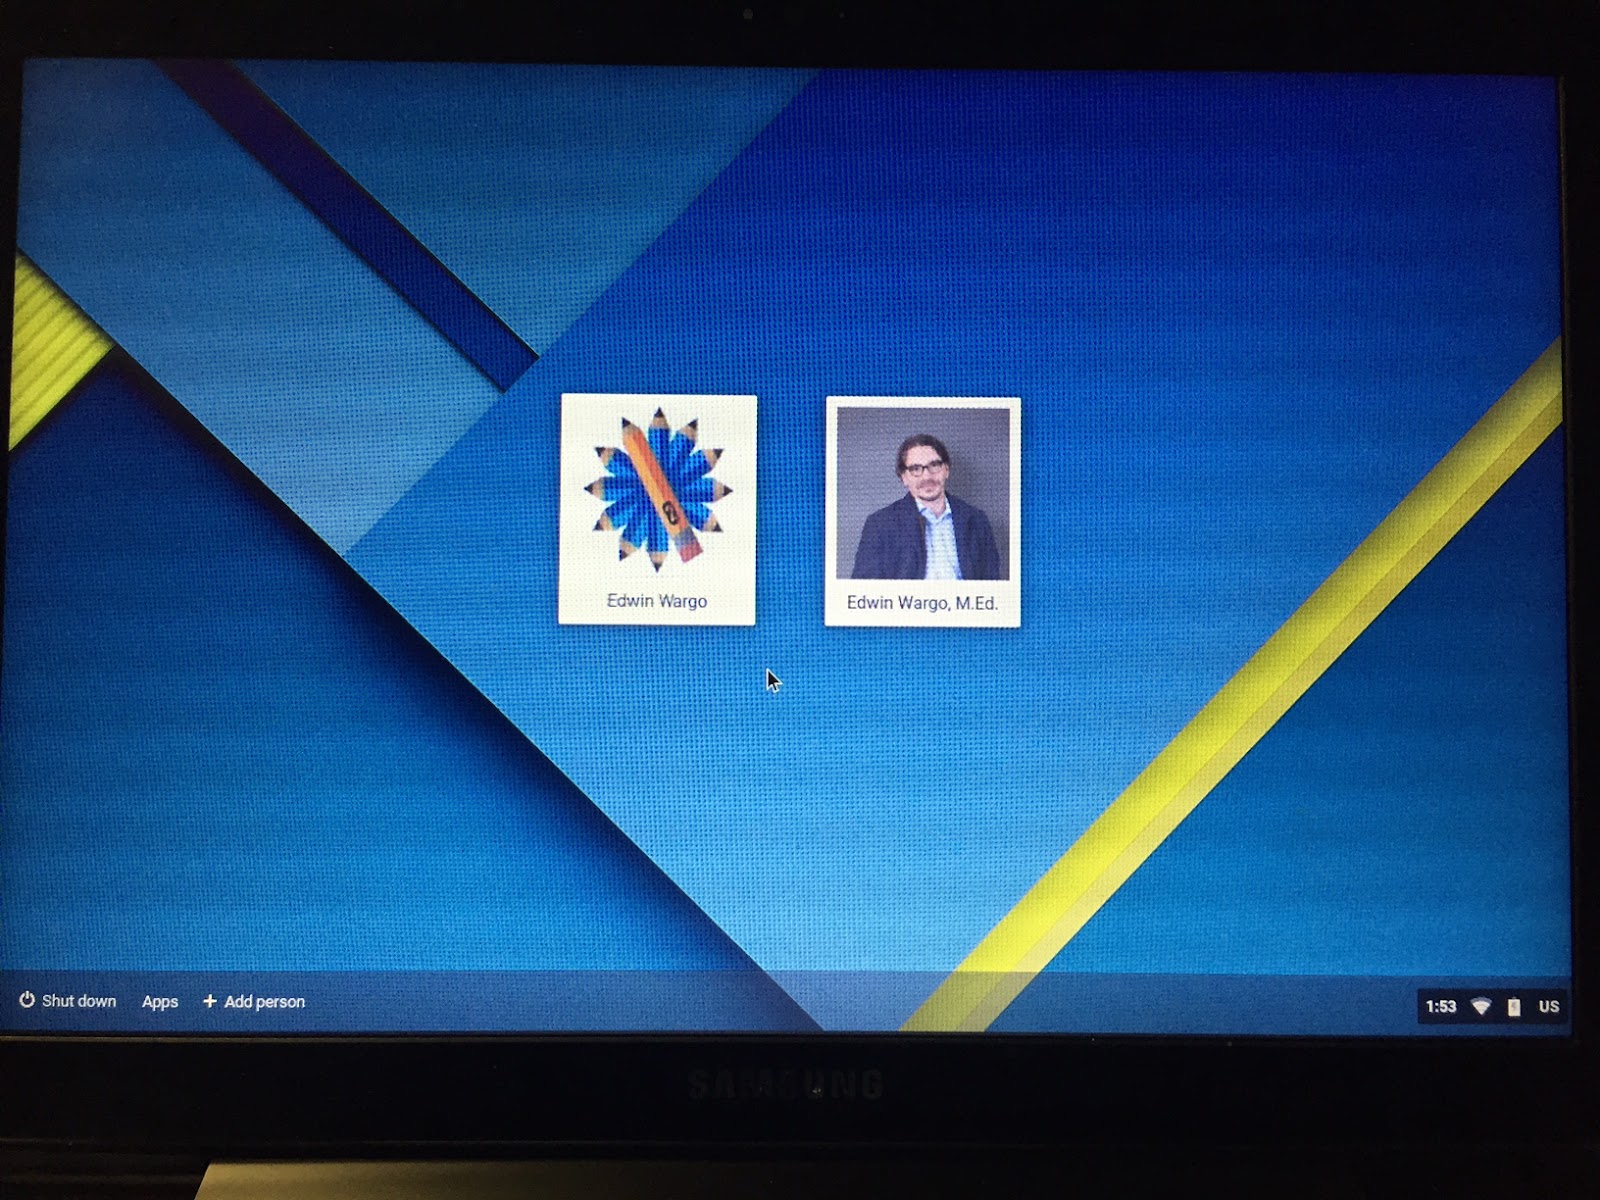
Where is the account being deleted from? I’m guessing (and please correct me if I’m wrong) that students are deleting other students’ profiles/accounts on the login screen.
Do your Chromebook login screens look like this?
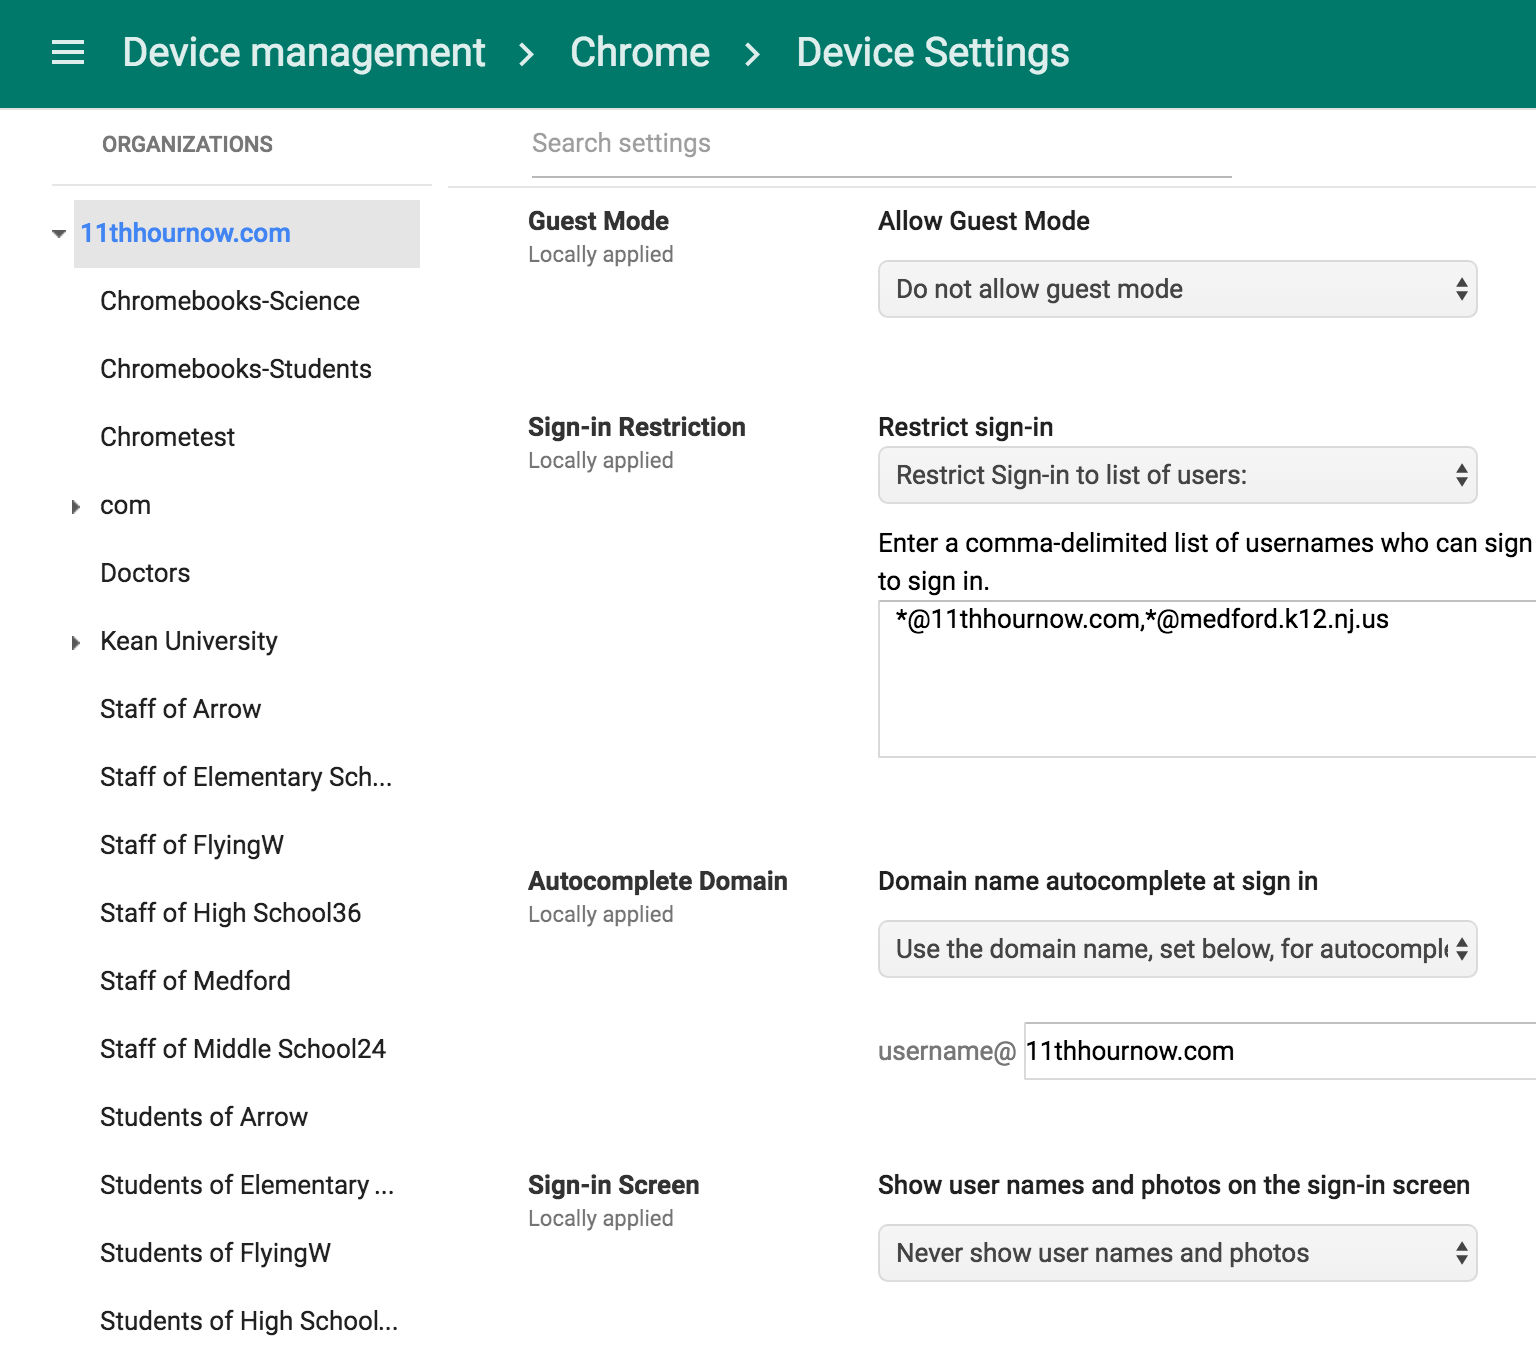
I saw in the Admin Console that you have “Always Show user names and Photos” selected. Turning this off is way to prevent it. Some districts have done it too as a way to keep the login screens from getting too cluttered.
You can also set the domain autocomplete so students wouldn’t have to type in the whole FQDN (franklin.k12.ga.us) to login.
Here are settings (and their respective locations) that can be made per OU:
Student can turn on high contrast mode, magnifier, large cursor, keyboard, etc and it will apply to the entire cart. It is not simultaneously, but it will eventually hit every Chromebook.
It sounds like there may be a couple of issues where.
First, do students use one assigned Chromebook, or do they use multiple Chromebooks? I ask because I’m wondering if the setting you are seeing is following students on each device.
Normally settings are applied via Admin Console policies or settings that staff/students change to customize their own profiles. Settings that one student changes should not impact all other students/Chromebooks.
I have not been able to replicate the propagation of these settings between my Chromebooks in my domain.
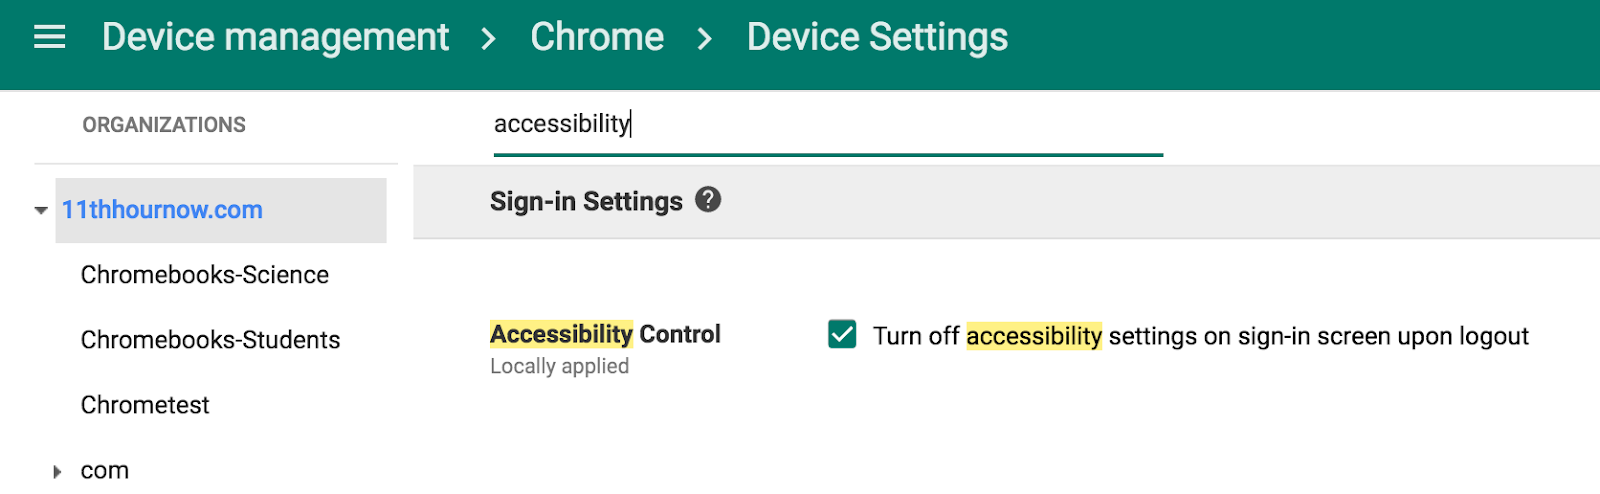
I see that you have “Turn off accessibility options on sign-in screen upon logout” checked in the Admin Console. That is a great start but doesn’t quite stop access to making Accessibility changes.
Second, turning off accessibility has been a discussion for a while. Many districts have echoed the same comments. There are some ADA issues surrounding turning-off accessibility for students/staff/teachers that may need to use the features on the fly. From what I’ve been told and hear, this is the reason Google hasn’t implemented the functionality in the Admin Console.
The most comprehensive way to keep these settings from being changed is to block access to all settings. You can do that by blocking access to: chrome://settings-frame
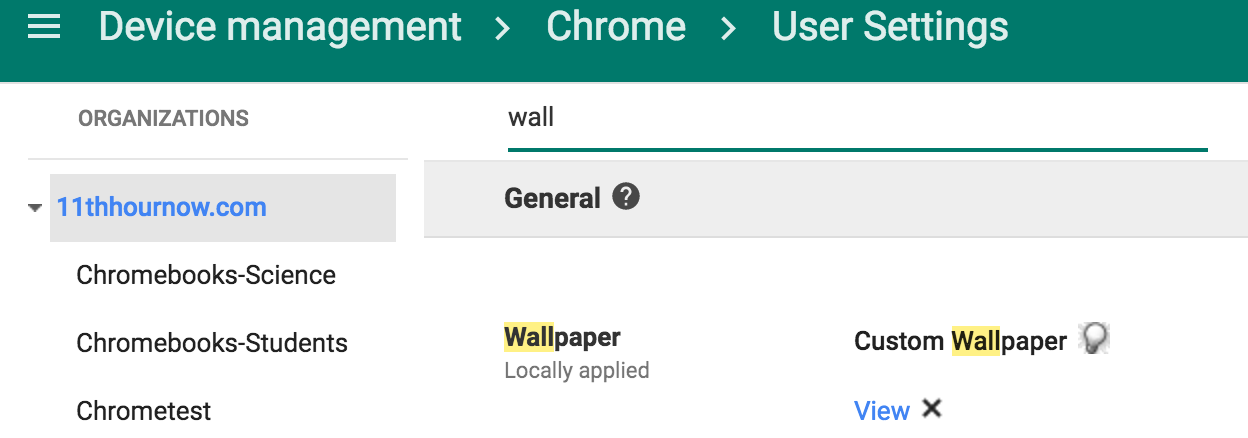
There is a screen image below where to make these changes by OU in Device Management > Chrome > User Settings > URL Blocking > URL Blacklist. You would add chrome://settings-frame
When students want to access settings they would see a “Page blocked” message.
As an FYI - you can view all the chrome:// links and URLs by going to: chrome://about/
These other URLs could also be blocked using the same method.
As another FYI - chrome://policies is a helpful diagnostic tool to see what the Chromebooks “sees” about the Admin Console policies.
This does also apply to PC/Mac browsers too.
Conceivably, you could/may need to create OUs for students/staff/teachers that need these Accessibility features.
Within the Chrome web browser, a student can alt-click and bring up a menu screen, and they can click inspect element. This brings up the web content in HTML format. A student was able to delete and change things, and it started to apply to other Chromebooks if they were logged in. The students exact words, "I am able to hack into the Chromebook".
Inspect is pretty powerful. I use it while coding.
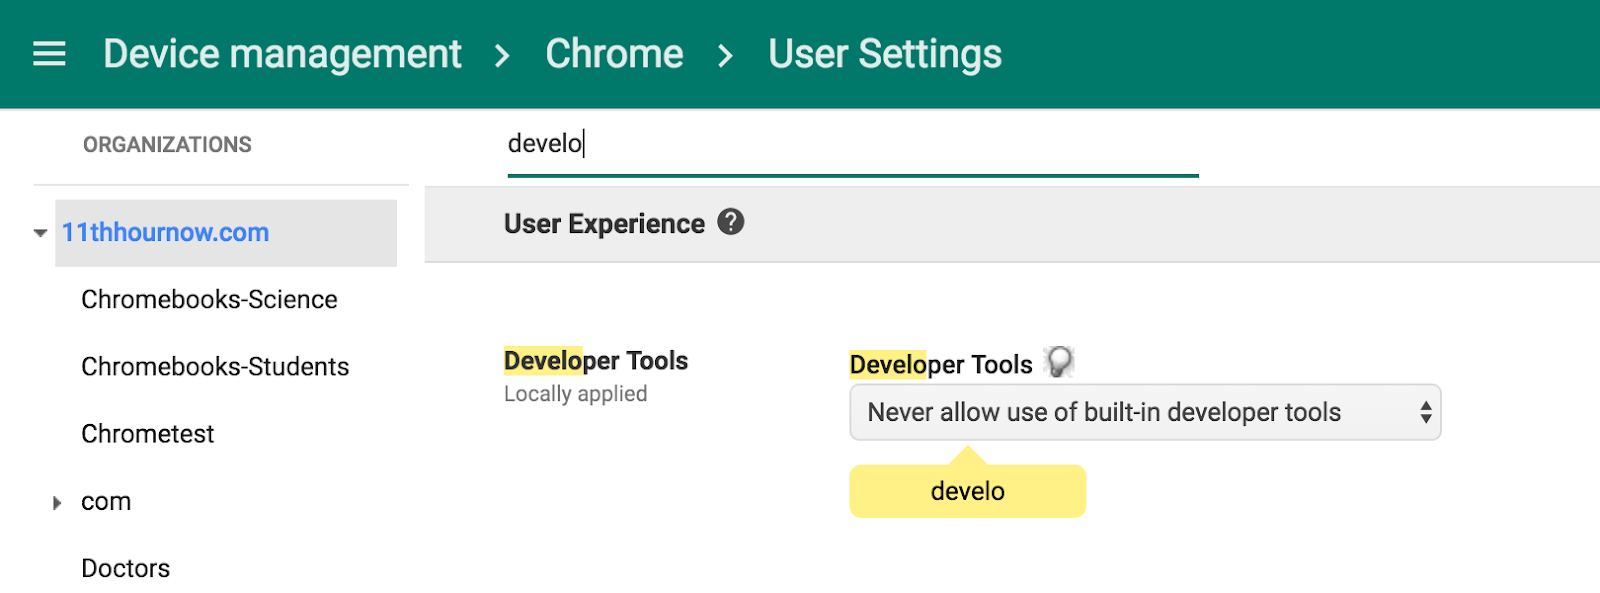
This can be shut-off by OU in the Admin Console under Device Management > Chrome > User Settings > Developer Tools.
Turning it off still will allow students to view a page source (just static code), but they will not be able to choose “Inspect”. It will be grayed out.
This will also apply to PC/Macs that the students use with Chrome since it is a User Setting.
Here is screen image showing that setting:
Students have also clicked on "enable auto repeat". When this is clicked on, students complain about the keys sticking. For example, if they hit the "T", it will type TTTT. This is challenging when they are trying to login to a website and get an error because they have entered the wrong username/password.
This could be prevented from adding chrome://settings-frame to the URL Blacklist as shown with the Accessibility features above.
Students won’t have the ability to turn it on.
Students can hide bookmarks that have been bookmarked on the toolbar. Teachers will complain that the bookmarks are gone, but they have only been hidden.
I’m assuming students are doing something like <CTRL> <SHIFT><B> or turning it off under Settings to hide the bookmarks.
If you choose “Enable bookmark bar” from Bookmark Bar in the Device Management > Chrome > User Settings, this disables the hiding of the Bookmarks Bar. It can be done per OU.
It grays out Show bookmarks bar from the settings menu. The Bookmarks bar perpetually shows once the policy is applied. Students won’t be able to hide it any longer.
As with other User Setting policies, this will also apply also to PC/Macs that the students use with Chrome since it is a User Setting.
Is there a way to delete a background that came pre-programmed on the Chromebook? Teacher is complaining about a background that shows a statue with some body parts showing. Since kids can change a background, can we either delete the background, or set it to where they cannot change a background?
There is no way per-se to delete the default background. I think the best option is to add one via the Admin Console.
If you set the Wallpaper (upload a JPEG/GIF), it precludes students from changing it. It could your district logo or a school building picture if you create different policies for your various buildings.
Also, once you add the image the “Set Wallpaper” button is grayed out in the Settings. I don’t believe there are any dimension requirements or anything specific needed for the image. I’ve used a few different sizes and resolutions in the past without issues.
Thursday, July 30, 2015
Importing Gmail from Vault (box file)
https://backupify.zendesk.com/hc/en-us/articles/203099158-Gmail-Exports-How-to-import-MBOX-exports-back-to-your-Gmail-account-
Restoring the emails from the export back in to Gmail can be done but requires the use of 3rd party applications to import the archived MBOX file back in to GMail. The export that you receive from us will contain an MBOX file for each label that you have backed up from Gmail. The 'AllMail' MBOX file will have all your Gmail records in it. Please follow the below steps to restore all emails from an MBOX file back in to your Gmail account.
Step 1: Setup your GMail account with Thunderbird
1) Download and Install the Thunderbird mail application: http://www.mozilla.org/thunderbird/
2) Launch Thunderbird and create a new account going to "File - New - Mail Account"
3) Enter your name, GMail email address, and GMail password. Make sure IMAP is selected and then click 'Continue'
4) Thunderbird will automatically get your settings if using GMail and then you can click "Create Account"
5) Now you will see your GMail account on the "All Folders" pane and you can open it to see all your emails. Thunderbird is now properly set up for your GMail account
Step 2: Install "ImportExportTools" Add-On for Thunderbird
1) To download the "ImportExportTools" extension utility that works with Thunderbird, go to https://addons.mozilla.org/en-us/thunderbird/addon/importexporttools/
2) On that page, locate the "Download ImportExportTools (MboxImport enhanced)". Right-click the link to download the xpi file and select "Save target as". Please note the location that you saved the .xpi file
3) In Thunderbird, go to "Tools - Add-ons" and click on "Install" in the Add-ons windows that pops-up
4) Locate the .xpi file that you downloaded and follow the instructions prompted to install
5) restart Thunderbird
Step 3: Extract the zipped up email archive file provided to you
1) Download and Extract the Gmail Export that we have sent you. The archive file is in .TGZ file format. TGZ files can be extracted natively in the Mac and Linux operating systems; however for Windows you may need to install a free app to extract the file. The easiest/free app that we find to work well is 7zip (http://www.7-zip.org/).
2) Using 7-Zip, extract the .tgz file that you received. Once extracted, you will have several MBOX files which are each named according to the cooresponding label in Gmail. Please note the location of where you extracted the files to.
Step 4: Import the emails from the MBOX file for the label that you want to restore
1) In Thunderbird, import the MBOX file to a local folder; in the navigation pane on the left, then right-mouse click "Local Folders" and then select 'Import/Export - Import mbox file'
2) Choose the option to "import directly one or more mbox files" and select 'OK'
3) In the files browser, locate the folder where you extracted the mbox files to in step 3 above. Select the mbox file that corresponds with the label that you want to restore and then click 'Open'
4) All emails from that label will now be importing. Please be patient, as it will take a while to load all of the emails.
Step 5: Copy the imported emails in to your GMail Account
1) In Thunderbird, in the navigation pane on the left, expand "Local Folders" and then select the folder below that has the name of the label that you are importing to Gmail
2) In that folder select all of the emails contained in the folder, right-mouse click the selection, and select 'Copy to - <gmail_account> - <label_name>'. (where gmail_account = the email address of your gmail account and label_name = the path to the label that you want to import the restored emails to)
3) All emails will now be importing to the label that you choose. Please be patient, as it will take a while to upload all of the emails to Gmail.
Once this is completed then you can log in to your GMail account online and you should see all of the emails restored to the label that you chose in your gmail account.
1) In Thunderbird, import the MBOX file to a local folder; in the navigation pane on the left, then right-mouse click "Local Folders" and then select 'Import/Export - Import mbox file'
2) Choose the option to "import directly one or more mbox files" and select 'OK'
3) In the files browser, locate the folder where you extracted the mbox files to in step 3 above. Select the mbox file that corresponds with the label that you want to restore and then click 'Open'
4) All emails from that label will now be importing. Please be patient, as it will take a while to load all of the emails.
Step 5: Copy the imported emails in to your GMail Account
1) In Thunderbird, in the navigation pane on the left, expand "Local Folders" and then select the folder below that has the name of the label that you are importing to Gmail
2) In that folder select all of the emails contained in the folder, right-mouse click the selection, and select 'Copy to - <gmail_account> - <label_name>'. (where gmail_account = the email address of your gmail account and label_name = the path to the label that you want to import the restored emails to)
3) All emails will now be importing to the label that you choose. Please be patient, as it will take a while to upload all of the emails to Gmail.
Once this is completed then you can log in to your GMail account online and you should see all of the emails restored to the label that you chose in your gmail account.
Tuesday, July 21, 2015
GHSA Eligibility Report
Student Information - Reports - GHSA Eligibility Form A Admin
Run the GHSA - Transcript Method
Period: Fall for Fall sports Spring for Spring sports
Student Information - Reports - GHSA Eligibility Form A Report
Fill in the blanks like below - click View Report
earned credit numbers will only show for 9+. Upcoming 9th graders will have "E" unless they took offered HS courses in MS.
Export in PDF format
Monday, June 29, 2015
EOPA Data Entry
*SR must be Signed Off BEFORE EOPA can be uploaded*
Make sure to use eligibility report to see what tests each kid is eligible for.
Get the list of test takers from FCHS (Test coordinator or Karen P)
Use the Eligibility Report to see the official Career Path name. Then use that name to see the eligible tests for that area (this data will be in the documentation on the DOE website).
Do not enter Failing tests.
Tuesday, June 23, 2015
Rolling School Year in IC
Create New School Year- School Year Setup>>New
- School Year
Create New Year - ie. 25-26
Start - ie. (2009) End Year ie (2010)
NO NOT make Active
Start Date - ie. (07/01/xxxx) End Date - ie. (06/30/xxxx)
School Year - select old school year from Drop Down - (CLICK) Load Preference Form Previous Year
Create New Year - ie. 25-26
Start - ie. (2009) End Year ie (2010)
NO NOT make Active
Start Date - ie. (07/01/xxxx) End Date - ie. (06/30/xxxx)
School Year - select old school year from Drop Down - (CLICK) Load Preference Form Previous Year

**MAKE NEW YEAR ACTIVE - SYSTEM ADMIN/CALENDARS/SCHOOL YEARS - uncheck to make inactive - check to make new active
(Before you make your New Year Active - Change Your Portal Access) Portal-Preferences
Make sure to uncheck: Schedule/Attendance/Grades
Search Groups: Teacher/Coach-Sponsor/Sped Lead Teacher and add previous school year to Calendar Rights to prevent access to new school year.
Calendar
-Calendar Wizard
--create new calendars by rolling forward selected data
Year (ie. 09-10)
Enter Start Date
Enter End Date
Select the Schools you want (All Except HS and MS)
Click - Next
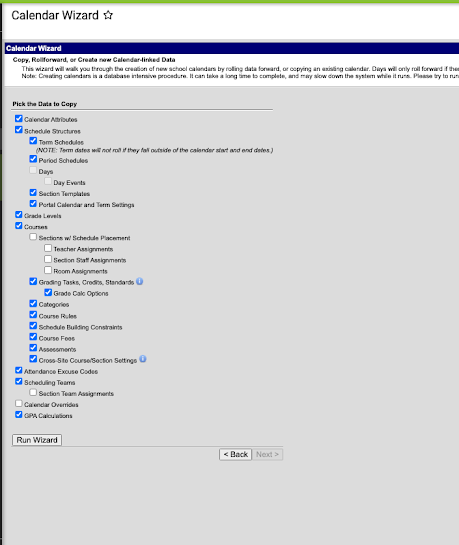
Pick DATA to Copy
Select -
Check ALL BOXES - Except for Days, and Days Events and Calendar Over-rides
Run Wizard
Scroll To Bottom and See Complete
For MS,
Check ALL BOXES - Except for Days, and Days Events and Calendar Over-rides, Sections w/Schedule Placement, Teacher Assignments, Section Staff Assignments, Room Assignments
Run Wizard
Scroll To Bottom and See Complete
For HS,
Check ALL BOXES - Except for Days, and Days Events and Calendar Over-rides, Sections w/Schedule Placement, Teacher Assignments, Section Staff Assignments, Room Assignments, Section Team Assignment


Run Wizard
Scroll To Bottom and See Complete
Log out and log back in to see the new calendar or RELOAD
For User Access For Users-Go to Group - Select Each School - and CHange the Calendar rights - for the current year --
Make Sure they have access to current year.
Change Year
-Calendar - calendar
change name - ie. 09-10 CES
SAVE
Terms - Change Term Dates to be the new terms
Periods - Click period schedules - Main 1 - or Main
Make Sure Period info is set correctly
Days -Click Day Reset -- Select all except. Sat. and Sun.
Create Days --
For HS - AFTER you do the Day Reset, you MUST click on DAY ROTATION (as long as they have MTWRF schedules)
Follow the image below. Then Click Assign Rotations.
Then Set Holidays, etc. - - Day Event Type- select Holiday from Dropdown SAVE - OK
To copy Calendar Holidays
-Calendar Wizard
--Copy Data into Existing Calendars
Pick Source Calendar - the Calendar you changed
Pick Destination Calendars
Select Copy Mode - Copy/Append (Elementary Schools - Select Terms/Days)
Select Boxes - Days and Day Events
Run Wizard
TO ROLL STUDENTS FORWARD
Search Tools for Enrollment Roll- Enrollment Roll Forward Wizard
- Pick High School
- Pick 9, 10, and 11 (middle school 8th only)
- Select Primary Source Service Type
Select Source structure Main
Select Start Status C continuing in same school
(8th grade will be U Transferred/Promoted)
Dest. Calendar new year
Select. Dest. Struct. Main
Start Date Select First Instructional Day
Select Destination Grade (only 5th to 6th or 8th to 9th)
Select Totals only
Select Show Warnings
Run Test
Run
To remove Skinny Structures or delete a course
Find Course
Scheduling Rules - Delete Rules
Composite Grading Clear (if rolled up)
Grading Task - Clear
If you want to use the course later UNCHECK ACTIVE - SAVE
Otherwise - - Delete Course
BEFORE New Calendar Set Up Make Sure to Removed Retained but don't do it until after Fall FTE count
At the end of the year-
Student Enrollment Cleanup (Wait Until Student Record is DONE)
Enrollment Clean-up- before you do the enrollment end batch (select - for all grades) and select (primary box)
Enrollment End Batch- (DO BEFORE STUDENT RECORDS)
Select 12 grade
Select End Date
Select G for Graduation for End status
Enter Diploma Date RUN
NOTE IMPORTANT - DO DAYS ROTATION - BY DAYS OF THE WEEK - to set - Calendar/Calendar/Periods
-During Scheduling (while using schedule wizard) - set days to [Monday, Wednesday, Friday, Tuesday, Thursday]
-Before Schedules are printed -set days to (Monday, Tuesday, Wednesday, Thursday, Friday]
To let Students enter Schedule Requirements
Go To Courses
Check --Allow Requests only for courses you want students to be able to request.
Enable Teacher access for requests Do new Group Teacher Course Requests create group
Tool Rights - instruction Teacher Course Requests all SAVE
Go to School set tool rights for Teacher course requests
Check --Allow Teacher Requests (do this in Current Year)
click on Scheduling Rules
Select Rule preceeds
Select Next Course in Sequence
Set any other new rules by adding new rules
Disable Student Portal Schedule Option
System admin - resources resourse
Portal options disable
To Set WALK-IN SCHEDULE for teachers to enter student requests during Advisement
Student Information General Schedule Check Read and Write
Create Counseling Group
Counseling Check all boxes (all counselors and Social Worker)
Remove Counseling Off of Scheduling Group
AGAIN: NOTE IMPORTANT - DO DAYS ROTATION - BY DAYS OF THE WEEK - to set - Calendar/Calendar/Periods
-During Scheduling (while using schedule wizard) - set days to [Monday, Wednesday, Friday, Tuesday, Thursday]
-Before Schedules are printed -set days to (Monday, Tuesday, Wednesday, Thursday, Friday]
**MAKE SURE TO ROLL FORWARD REPORT CARDS and Transcripts**
System Admin - Preference - Reports
**Roll emails and anything for Mastery Connect
HP Switch Info
1-800-334-5144 (SHORT CUT TO ASSOCIATE - SAY PROCURVE SWITCH)
Lavonia Elementary - Case# 3605110164 (Chris)
Serial Number - SG802AM06E
Oct. 18, 2012
Carnesville Elementary - Case # 4684600130 (Richard)
Serial Number - SG807VBH3S -received shipment of HP switch box only on 10/19
Called support back on Oct. 30th - Model: J4839a -Power supply died: Serial number for the power supply is IN801NU0KJ
New Case # - 4685452892 (Caesar)
Royston Elementary 4th grade rack - Case # 4707302606
Serial Number - SG805VAH15
Lavonia Elementary - Case# 3605110164 (Chris)
Serial Number - SG802AM06E
Oct. 18, 2012
Carnesville Elementary - Case # 4684600130 (Richard)
Serial Number - SG807VBH3S -received shipment of HP switch box only on 10/19
Called support back on Oct. 30th - Model: J4839a -Power supply died: Serial number for the power supply is IN801NU0KJ
New Case # - 4685452892 (Caesar)
Royston Elementary 4th grade rack - Case # 4707302606
Serial Number - SG805VAH15
November 11, 2013
Royston Elem- Case #4714801344
Serial number sg805vah15
Called support on 11/11, Replacement switch is being sent overnight/
Subscribe to:
Posts (Atom)