Wednesday, August 5, 2026

Enable QC for New OU

Make sure settings are correct on student and device OUs. Then, add the new OU by going to CL management page, choose Single Sign On, then single sign in, click the gear by Quick Card Recognition. Add the new OU to be added here. This will need to be done at the beginning of the year for KK students.


Thursday, July 30, 2026

Class Link OUs

Add OUs for 9th, 6th, KK and PK by going to Group Import, under Google Apps select Import. Select Grade Level and then Next, find it in the list and check it. Then click Import...

Friday, November 7, 2025

Attendance Messenger

 The daily/weekly callouts for attendance need to be updated at the beginning of each year. 

To do this, log into the System Administrator account to avoid the messages showing a specific sender's name. 

Navigate to Attendance Messenger Scheduler

Expand Admin and then each one inside of Admin. 

Update the calendar to the current year. 


Tuesday, September 23, 2025

Name Changes


Infinite Campus- create new identity. Change UN. Update the email on the Demographics page for Classlink matching. 


Email- update user changing the last name and the email address. 


Audio Enhancement (teachers)- change name and email. It will not allow you to change the username. 


Verkada- name and email

TKES- name and email 

Centegix- name (it will not allow you to change the email)


Send this email to the user: 


I have updated your email and IC username to NEW USER NAME HERE. Please use that for logging into both applications. You will still receive emails sent to OLD USERNAME HERE@


I have also updated your name in TKES, Centegix, Verkada, and Audio Enhancement. However, for some reason Audio Enhancement does not allow me to edit the actual username. You will still need to use OLD USERNAME HERE when logging into the camera system. 


Please let me or your school tech know if you have any trouble with these applications. 


Andrew


Monday, June 23, 2025

Marking Gifted in IC

 There are two places where a student needs to be marked as Gifted to correctly report for Student Record. See the attached Gifted SR Info for the 4 fields that are reported and where they pull from. 

1. Find the student you need to add

2. Click Student Information in the Index

3. Select Gifted under Program Participation


From the Gifted tab, enter 
1. Start Date
2. Program Status (although this field is NOT reported for some reason) 
3. Gifted Eligibility 
4. Gifted Referral 
5. Any Comments needed (these are not reported)
6. Save


Next, go back to Student Information and choose Program Services. 

1. Choose New at the bottom
2. Select Gifted Service
3. Enter a Start Date
4. Enter a Gifted Served status (this reports the Gifted Served field)
5. Click Save

The other fields here are not reported. 

To end a kid's gifted status, just add end dates to BOTH tabs. 


Tuesday, June 10, 2025

Change OU Sync in Go Guardian

See email from GG support on June 10, 2025-- the video is most helpful.

When viewing your organization's 
https://manage.goguardian.com/integrations/ou-settings page, on my end I can confirm that Google Admin Console is currently your organization's OU Source. Though your organization may have chosen ClassLink as an integration source recently, this would not impact your organization's OU structure if Google Admin Console remains your organization's selection!

I recorded a video to help visualize my recommendations, but I can summarize through text below as well: https://www.loom.com/share/7f11d2bdb33e47f3a0866ebc9bc984dd?sid=a16cba55-986a-4812-9e13-2f20185d432d

If OU changes have been made recently and this is not reflecting in GoGuardian, I do recommend both capturing screenshots of your Policy structure and a full re-authorization in GoGuardian. With significant structural changes including OU renaming, this re-authorization may absolutely be necessary. Just to note with this as well, new sub-OU's are not automatically included in automatic Google Admin Console OU syncs. When new OU's are created, it is necessary to perform a manual sync and select new OU's to be included in these syncs.

The reason I recommend capturing these screenshots is because GoGuardian is not deeply connected to your OU structure in a way in which we can guarantee significant OU name changes or structural changes will not clear out your Policy structure and other OU related settings. GoGuardian may not be able to interpret an OU name change and swap out the previous OU with then new name - making it necessary to re-select OU's in some settings and re-assign policies.

This would mean capturing screenshots of the https://admin.goguardian.com/policy/assign/in-school page prior to performing an OU sync as a reference. 

And then both re-selecting your newly named OU's in the https://admin.goguardian.com/smart-alerts/triggers page for Triggers and the https://manage.goguardian.com/products/beacon page with Beacon deployments. 

To perform this re-authorization, I recommend accessing an incognito window and accessing manage.goguardian.com. In the upper right is a circular OU sync button. This can be selected and "sync org units with GAC" selected. The key is the import prompt in which you would make sure all newly named OU's are selected and then the sync performed.

Absolutely feel free to stay in touch and let me know the results or if you had additional questions!

Thank you, 

Friday, May 30, 2025

ClassLink Summer

Once school is out, go into Roster Server>>Imports>>Sync Schedule>> set the Roster Blackout dates to current date through the date you will make the new year active. 


Once the new year is active, turn this back off. 

Go and check Thresholds

In OneSync

Make sure the Year Rollover date is the date you will make the new year active. 

Go to the gear in the upper right and then click General Settings, 


Wednesday, February 26, 2025

SFES Phone Greeting

 RES Main-  *2910

RES Holiday- *2919


You will hear the existing message start playing. Press * to rerecord the message.

Once you hear a beep, you can start recording the message. 

When you are done with the message dial #.

1 to listen to message

2 to save the message. After you save the message, you can hang up. 

 * to record the message again


Please reply to this e-mail to respond.

Wednesday, November 13, 2024

Posting Elem CAMP Grades

You will do this in the Task Scheduler.

I have the task in your Task Scheduler named “ES Term Grades Posting”. There will be a few things that will need to be set each time you run it.


This part will need to have the correct (6,8,11,13) for midterm grades and then (5,7,10,12) for quarter grades and = 14 for the yearly average. Then below will need to be set for the correct term you are posting for.

and gt.taskid in (6,8,11,13) -- M1,M2,M3,M4 --(5,7,10,12)-Q1,Q2,Q3,Q4 -- = 14 --Yearly Average


For the term seq just set it to the term you are running for:


and t.seq = 3


Make sure the window is open and set it to run in the future. 


Here are the settings for Q2, M2


Here are the ones for Q1, Q1


Thursday, October 24, 2024

How to Key Consult in IC

 How to key consult courses in IC


Do not put the .9 in the course number

Add a sped teacher with consult as the role. You can also limit their gradebook access on the Staff History tab since this co-teacher does not necessarily need to see the entire class's information. 


For inclusion, choose consult

For delivery model, choose consult


Monday, October 21, 2024

Importing Photos into Mosaic/Lunchbox

You will need this link:  https://help.heartlandschoolsolutions.com/s/article/Mosaic-POS-Upload-Student-Photos 


Run the photo export from Plicgo using the 

CafeteriaIDisGTID

 custom format. This will pull with just the 10 digit ID as the name of the file for Lunchbox import. 

You will need to open Filezilla and use these credentials:

HOST: cpsftp.heartlandmosaic.com

PORT: 22

USERNAME: 1302250

PASSWORD: Hss30521


Drag the images into the Photos folder (this takes a while). When all are there, go into Mosaic and run the Express Student Photo Import. 


Destiny- Use a file with the 5 digit personID in it. Make sure the idlink.txt file is in there. Compress the file.


Log into Destiny 

Choose a School 

Admin>>Upload Patron Pictures

Choose the file and click Upload Patrons


Wednesday, October 2, 2024

Adobe Pro for Windows

 Add the user


Download the software


For Windows installs, run the installer found above. First time users will need to create a PW and verify their account via email. 

Users will login with their email and password once the software has installed. 


For Mac users, add the users. Download the correct version of the software. Install the software. Users will have to login. 


Tuesday, July 18, 2023

CO Voicemail Setup

 If you have not set up your voicemail yet, here are some instructions:

1. Press the envelope icon 
2. Press 0 for mailbox options
3. Follow the prompts to record the following things
     -Your unavailable message (1)
     - Your busy message (2)
     - Your name (3)


Your voicemail password is your extension number. 

All voicemails should be delivered to your email inbox. 

Let me know if you have any trouble. 


Andrew

Monday, June 12, 2023

Adding Students and Transcripts to Parchment

Adding/Updating Students

Run the Parchment Upload ad hoc and paste the five fields into the CSV template 

Log in to Parchment

Learners>> Actions dropdown>>Choose Upload Multiple Learners>>Give the file a name>>Upload>>Hit Continue a few times (mapping will be accurate if you use the template linked above)

(Any blank fields will cause the upload NOT to work)

Uploading Transcripts

Run a batch of current transcripts. This will need to be done after January posting and after June posting.  

Log in to Parchment

Select Credentials>>Add Credentials


Upload the file. 

After processing (5-10 mins), go back to the same place and click Match Credentials. These students will need to be added. 


Monday, May 16, 2022

Finding Mac/Physical Address in Windows 10


How to find MAC address using Control Panel

To determine the physical address of a network card on Windows 10 with Control Panel, use these steps:

  1. Open Control Panel.
  2. Click on Network and Internet.
  3. Click on Network and Sharing Center.


  4. Click the Change adapter settings from the left pane.

    Double-click the Ethernet or Wi-Fi adapter depending on your connection.


  5. Click the Details button.


    Source: Windows Central

  6. Confirm the MAC address of the network adapter (called physical address sometimes).


Thursday, January 27, 2022

Running Presidential Awards

 APs usually ask for this after Semester 1 ends


Use the Ad Hoc folder called Presidential Awards

1. Run the ad hoc for milestones (if they have been imported). This will give you performance levels. 

2. Grades for Presidential will give you posted Q2 grades. Filter and removed anything other than (ELA, math, sci, ss). 

3. Transcript Grades for Presidential will give you all 5th graders posted grades from last year. Filter and removed anything other than (ELA, math, sci, ss). 


Combine the sheets for numbers 2 and 3 above making sure the fields line up. Sort on the last and first name. You will also need to concatenate the name fields. You might have to use the text to columns feature to format the numbers correctly. 

Once you have done this, subtotal at each change in full name to show the average of all the grades. Then paste special (values) to get the averages in another sheet. Then filter on the word averages and paste special one more time in another sheet. Sort these averages. 

Then all you need to do is add the performance levels in this sheet. 

Convert Numbers in Excel

 https://support.microsoft.com/en-us/office/convert-numbers-stored-as-text-to-numbers-40105f2a-fe79-4477-a171-c5bad0f0a885


Cells with numbers stored as text with green triangles

Numbers that are stored as text can cause unexpected results. Select the cells, and then click Excel Error Alert button to choose a convert option. Or, do the following if that button isn't available.

1. Select a column
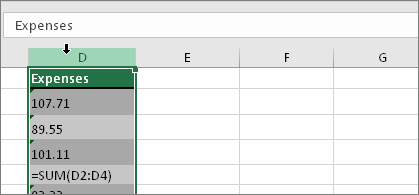
Selected column

Select a column with this problem. If you don't want to convert the whole column, you can select one or more cells instead. Just be sure the cells you select are in the same column, otherwise this process won't work. (See "Other ways to convert" below if you have this problem in more than one column.)

2. Click this button
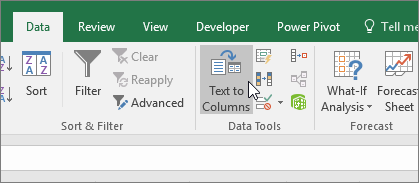
Data tab, Text to Columns button

The Text to Columns button is typically used for splitting a column, but it can also be used to convert a single column of text to numbers. On the Data tab, click Text to Columns.

3. Click Apply

The rest of the Text to Columns wizard steps are best for splitting a column. Since you're just converting text in a column, you can click Apply right away, and Excel will convert the cells.

4. Set the format


Sunday, August 9, 2020

Excel: Sort by Month and Day


  1. Insert a blank column next to your Date column.
  2. Assuming your first date is in cell A4, in the blank column, enter the formula: =TEXT(A4,"MMDD")
  3. Copy this formula down to the bottom of your data.
  4. Sort your data on this column.

Tuesday, June 30, 2020

Disable SLDS (for summer)

Do this so that kids cannot see their schedule. 


To disable SLDS- you will need to go to Index> Sys Admin> Custom > Custom Tab>SLDS Portal > Uncheck the publish to Portal box> Save

Thursday, June 18, 2020

Smart Fusion Hosted Instructions

Smart Fusion Hosted Instructions

For a Mac

1.     In any browser, navigate to this address (please bookmark it as Smart Fusion) https://smartfusion2.harrisschool.solutions/rdweb/webclient/index.html


2.     Enter this for the user and password

User:  franklinfirstinitiallastname  (for example, franklintsmith)
Password:  ChangeMe!

3.     You will receive a message that includes “Click here to change your password” Click that link


Domain Username:  CUSTOMER\franklinfirstinitiallastname
            (for example, CUSTOMER\franklintsmith)
Current Password:  ChangeMe!
New Password:  FClions!
Confirm Password:  FClions!

Click Submit

It will say your password has been successfully changed. Click OK
(If prompted to save this password, please do so)


4.     You will be taken back to the main page. Log in with the username and the FClions! password.


5.     You will come to a page with an icon named Smart Fusion Franklin BOE. Click that icon


6.      It should then connect and show you the same gray login box that users have seen before. The same username and password that they have previously used to login to the application will still work here.


For a Windows Machine

(please bookmark it as Smart Fusion)

2.     Click on the link to Install Harris School Solution Hosting for Windows

3.     Install that icon to the desktop.

4.     Then click on that icon and follow steps 2-6 from above

Make sure to remove the old icon from PCs and the Remote Desktop icon from Macs.