Technology

Technology

Thursday, July 30, 2015

Importing Gmail from Vault (box file)

https://backupify.zendesk.com/hc/en-us/articles/203099158-Gmail-Exports-How-to-import-MBOX-exports-back-to-your-Gmail-account-


Restoring the emails from the export back in to Gmail can be done but requires the use of 3rd party applications to import the archived MBOX file back in to GMail. The export that you receive from us will contain an MBOX file for each label that you have backed up from Gmail. The 'AllMail' MBOX file will have all your Gmail records in it. Please follow the below steps to restore all emails from an MBOX file back in to your Gmail account.

 
Step 1: Setup your GMail account with Thunderbird
1) Download and Install the Thunderbird mail application: http://www.mozilla.org/thunderbird/
2) Launch Thunderbird and create a new account going to "File - New - Mail Account"
3) Enter your name, GMail email address, and GMail password. Make sure IMAP is selected and then click 'Continue'
4) Thunderbird will automatically get your settings if using GMail and then you can click "Create Account"
5) Now you will see your GMail account on the "All Folders" pane and you can open it to see all your emails.  Thunderbird is now properly set up for your GMail account
 
 
Step 2: Install "ImportExportTools" Add-On for Thunderbird
1) To download the "ImportExportTools" extension utility that works with Thunderbird, go to https://addons.mozilla.org/en-us/thunderbird/addon/importexporttools/
2) On that page, locate the "Download ImportExportTools (MboxImport enhanced)". Right-click the link to download the xpi file and select "Save target as". Please note the location that you saved the .xpi file
3) In Thunderbird, go to "Tools - Add-ons" and click on "Install" in the Add-ons windows that pops-up
4) Locate the .xpi file that you downloaded and follow the instructions prompted to install
5) restart Thunderbird
 
 
Step 3: Extract the zipped up email archive file provided to you
1) Download and Extract the Gmail Export that we have sent you. The archive file is in .TGZ file format. TGZ files can be extracted natively in the Mac and Linux operating systems; however for Windows you may need to install a free app to extract the file. The easiest/free app that we find to work well is 7zip (http://www.7-zip.org/). 
2) Using 7-Zip, extract the .tgz file that you received. Once extracted, you will have several MBOX files which are each named according to the cooresponding label in Gmail. Please note the location of where you extracted the files to.
 
Step 4: Import the emails from the MBOX file for the label that you want to restore
1) In Thunderbird, import the MBOX file to a local folder; in the navigation pane on the left, then right-mouse click "Local Folders" and then select 'Import/Export - Import mbox file'
2) Choose the option to "import directly one or more mbox files" and select 'OK'
3) In the files browser, locate the folder where you extracted the mbox files to in step 3 above.  Select the mbox file that corresponds with the label that you want to restore and then click 'Open'
4) All emails from that label will now be importing. Please be patient, as it will take a while to load all of the emails.


Step 5: Copy the imported emails in to your GMail Account
1) In Thunderbird, in the navigation pane on the left, expand "Local Folders" and then select the folder below that has the name of the label that you are importing to Gmail
2) In that folder select all of the emails contained in the folder, right-mouse click the selection, and select 'Copy to - <gmail_account> - <label_name>'. (where gmail_account = the email address of your gmail account and label_name = the path to the label that you want to import the restored emails to)
3) All emails will now be importing to the label that you choose. Please be patient, as it will take a while to upload all of the emails to Gmail.

Once this is completed then you can log in to your GMail account online and you should see all of the emails restored to the label that you chose in your gmail account.

Tuesday, July 21, 2015

GHSA Eligibility Report

Student Information - Reports - GHSA Eligibility Form A Admin
Run the GHSA - Transcript Method
Period: Fall for Fall sports    Spring for Spring sports


Student Information - Reports - GHSA Eligibility Form A Report
Fill in the blanks like below - click View Report
earned credit numbers will only show for 9+.  Upcoming 9th graders will have "E" unless they took offered HS courses in MS. 
Export in PDF format


Monday, June 29, 2015

EOPA Data Entry

*SR must be Signed Off BEFORE EOPA can be uploaded*

Make sure to use eligibility report to see what tests each kid is eligible for.

Get the list of test takers from FCHS (Test coordinator or Karen P)

Use the Eligibility Report to see the official Career Path name. Then use that name to see the eligible tests for that area (this data will be in the documentation on the DOE website).

Do not enter Failing tests. 

Tuesday, June 23, 2015

Rolling School Year in IC


Create New School Year- School Year Setup>>New

- School Year
Create New Year - ie. 25-26
Start - ie. (2009) End Year ie (2010)
NO NOT make Active
Start Date - ie. (07/01/xxxx) End Date - ie. (06/30/xxxx)
School Year - select old school year from Drop Down - (CLICK) Load Preference Form Previous Year


**MAKE NEW YEAR ACTIVE - SYSTEM ADMIN/CALENDARS/SCHOOL YEARS - uncheck to make inactive - check to make new active

(Before you make your New Year Active - Change Your Portal Access)  Portal-Preferences
Make sure to uncheck: Schedule/Attendance/Grades

Search Groups: Teacher/Coach-Sponsor/Sped Lead Teacher and add previous school year to Calendar Rights to prevent access to new school year.


Calendar
-Calendar Wizard
--create new calendars by rolling forward selected data

Year (ie. 09-10)
Enter Start Date
Enter End Date

Select the Schools you want (All Except HS and MS)
Click - Next


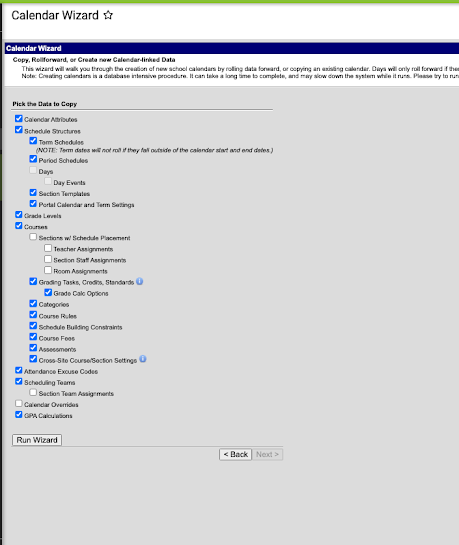
Pick DATA to Copy

Select -

Check ALL BOXES - Except for Days, and Days Events and Calendar Over-rides

Run Wizard

Scroll To Bottom and See Complete

For MS,

Check ALL BOXES - Except for Days, and Days Events and Calendar Over-rides, Sections w/Schedule Placement, Teacher Assignments, Section Staff Assignments, Room Assignments

Run Wizard

Scroll To Bottom and See Complete

For HS,

Check ALL BOXES - Except for Days, and Days Events and Calendar Over-rides, Sections w/Schedule Placement, Teacher Assignments, Section Staff Assignments, Room Assignments, Section Team Assignment 


Run Wizard

Scroll To Bottom and See Complete


Log out and log back in to see the new calendar or RELOAD

For User Access For Users-Go to Group - Select Each School - and CHange the Calendar rights - for the current year --
Make Sure they have access to current year.


Change Year

-Calendar - calendar
change name - ie. 09-10 CES
SAVE

Terms - Change Term Dates to be the new terms
Periods - Click period schedules - Main 1 - or Main
Make Sure Period info is set correctly

Days -Click Day Reset -- Select all except. Sat. and Sun.
Create Days -- 

For HS - AFTER you do the Day Reset, you MUST click on DAY ROTATION (as long as they have MTWRF schedules)
Follow the image below. Then Click Assign Rotations.


Then Set Holidays, etc. - - Day Event Type- select Holiday from Dropdown SAVE - OK


To copy Calendar Holidays
-Calendar Wizard
--Copy Data into Existing Calendars

Pick Source Calendar - the Calendar you changed

Pick Destination Calendars

Select Copy Mode - Copy/Append (Elementary Schools - Select Terms/Days)
Select Boxes - Days and Day Events
Run Wizard


TO ROLL STUDENTS FORWARD
Search Tools for Enrollment Roll- Enrollment Roll Forward Wizard
- Pick High School
- Pick 9, 10, and 11 (middle school 8th only)
- Select Primary Source Service Type

Select Source structure Main
Select Start Status C continuing in same school
(8th grade will be U Transferred/Promoted)
Dest. Calendar new year
Select. Dest. Struct. Main
Start Date Select First Instructional Day
Select Destination Grade (only 5th to 6th or 8th to 9th)
Select Totals only
Select Show Warnings
Run Test
Run


To remove Skinny Structures or delete a course
Find Course
Scheduling Rules - Delete Rules
Composite Grading Clear (if rolled up)
Grading Task - Clear
If you want to use the course later UNCHECK ACTIVE - SAVE
Otherwise - - Delete Course

BEFORE New Calendar Set Up Make Sure to Removed Retained but don't do it until after Fall FTE count

At the end of the year-

Student Enrollment Cleanup (Wait Until Student Record is DONE)
Enrollment Clean-up- before you do the enrollment end batch (select - for all grades) and select (primary box)


Enrollment End Batch- (DO BEFORE STUDENT RECORDS)

Select 12 grade
Select End Date
Select G for Graduation for End status
Enter Diploma Date RUN


NOTE IMPORTANT - DO DAYS ROTATION - BY DAYS OF THE WEEK - to set - Calendar/Calendar/Periods
-During Scheduling (while using schedule wizard) - set days to [Monday, Wednesday, Friday, Tuesday, Thursday]
-Before Schedules are printed -set days to (Monday, Tuesday, Wednesday, Thursday, Friday]


To let Students enter Schedule Requirements
Go To Courses
Check --Allow Requests only for courses you want students to be able to request.

Enable Teacher access for requests Do new Group Teacher Course Requests create group
Tool Rights - instruction Teacher Course Requests all SAVE
Go to School set tool rights for Teacher course requests


Check --Allow Teacher Requests (do this in Current Year)
click on Scheduling Rules
Select Rule preceeds
Select Next Course in Sequence
Set any other new rules by adding new rules


Disable Student Portal Schedule Option
System admin - resources resourse
Portal options disable


To Set WALK-IN SCHEDULE for teachers to enter student requests during Advisement

Student Information General Schedule Check Read and Write


Create Counseling Group
Counseling Check all boxes (all counselors and Social Worker)

Remove Counseling Off of Scheduling Group

AGAIN: NOTE IMPORTANT - DO DAYS ROTATION - BY DAYS OF THE WEEK - to set - Calendar/Calendar/Periods
-During Scheduling (while using schedule wizard) - set days to [Monday, Wednesday, Friday, Tuesday, Thursday]
-Before Schedules are printed -set days to (Monday, Tuesday, Wednesday, Thursday, Friday]

**MAKE SURE TO ROLL FORWARD REPORT CARDS and Transcripts**
System Admin - Preference - Reports

**Roll emails and anything for Mastery Connect

HP Switch Info


1-800-334-5144 (SHORT CUT TO ASSOCIATE - SAY PROCURVE SWITCH)

Lavonia Elementary - Case# 3605110164 (Chris)
Serial Number - SG802AM06E


Oct. 18, 2012
Carnesville Elementary - Case # 4684600130 (Richard)
Serial Number - SG807VBH3S -received shipment of HP switch box only on 10/19

Called support back on Oct. 30th - Model: J4839a -Power supply died: Serial number for the power supply is IN801NU0KJ
New Case # - 4685452892 (Caesar)

Royston Elementary 4th grade rack - Case # 4707302606 
Serial Number - SG805VAH15

November 11, 2013
Royston Elem- Case #4714801344
Serial number sg805vah15

Called support on 11/11, Replacement switch is being sent overnight/

Teacher Website Help


Kim Fulbright at LES has created this helpful PowerPoint to assist her teachers in using the school website. 
If you use it, you will want to change a few things that apply to LES (for example, the website address).

Dowload the .ppt file:
Download file "ClassWebsiteGuide.ppt"

Mac OS X Shortcuts


Download the file below:
Download file "Mac OS X Shortcuts.pdf"

IP Range for Schools


CES - 10.2
CFES - 10.6
LES - 10.4
RES - 10.5
FCMS - 10.2
FCHS - 10.1
CO- 10.11

How to Repair Permissions on a Mac


Many things you install in Mac OS X are installed from package files (whose filename extension is ".pkg"). Each time something is installed from a package file, a "Bill of Materials" file (whose filename extension is ".bom") is stored in the package's receipt file, which is kept in /Library/Receipts/ . Each of those ".bom" files contains a list of the files installed by that package, and the proper permissions for each file.


Download file "7911a.jpg"
This fix will correct errors with Microsoft Office and other installed applications.

Follow these steps:

1. Locate the Utilities folder under Applications

2. Click Disk Utility


3. Make sure the HD is selected in the left-hand column

4. Click the Repair Permissions button at the bottom of the screen (this make take a couple of hours)

BOE Room Projector


How to clean or change the filter on the projector in the BOE room:


MS Scheduling

You can assign ALL of one grade level the proper academic classes and then go back and remove the requests for Gifted (.2) and Co-Teaching (.9) classes. Or you can assign all academics based on the classes the students had last year. 

2011- Daphne requested regular academics for all kids, and I went back and removed the requests for Gifted and CO-teaching and then added the correct courses ALL BASES ON PRIOR YEAR ROSTER. I also did this for band and chorus classes.

NOTE- the box on the first screen is the course you are working with regarding requests. The next screen will be where you want to pull rosters FROM.


Click for full-size image


Middle School Scheduling (2012)
1. Create all sections
2. Create Teams (Scheduling> Scheduling Groups)
3. Put team names on sections (only place these labels on regular ed sections of ELA, Math, SS, and Sci)
4. Place students on teams from Walk-In Scheduler (save requests)
5. Ad hoc regular ed kids- (watch out for kids who have been gifted at some point in the past- this was an issue in 2012. None of the kids who had previously been marked as gifted had a math or LA class)
6. Use this ad hoc with the Request Wizard to give kids reg ed courses (gifted and sped are scheduled by hand)
7. Use Request Wizard to request PE, Art, Tech, Ag, Business, and Words for ALL grade levels (don’t forget ELT)
AT THIS POINT, Daphne hand keys all sped, gifted, and any other special schedules.
8. New sections are created and teachers are updated on course tab
9. Lock all sections in the Wizard
10. Run a full load
11. Use the Student Gap Scheduler to see holes in schedules
12. If necessary, use the Gap Filler to add PE to empty slots

PC Keyboard Issues


When I type in Windows, my keyboard only allows me to type one letter at a time, and I have to wait several seconds before I can type another letter. What is wrong and how do I fix it? 

You may have accidentally turned on the FilterKeys feature, or you need to adjust your keyboard's repeat delay and rate settings. 
  • To turn off the FilterKeys feature: 
    1. Click the Start button.
    2. Select Control Panel.
    3. Click the Accessibility Options link.
    4. Click the Adjust the contrast for text and colors on your screen link.
    5. Select the Keyboard tab.
    6. Clear the Use FilterKeys check box.
    7. Click OK.
    8. Close all windows.
  • To adjust your keyboard's repeat delay and rate settings: 
    1. Click the Start button.
    2. Select Control Panel.
    3. Click the Printers and Other Hardware link.
    4. Click the Keyboard link.
    5. Drag the Repeat delay: slider to Short.
    6. Drag the Repeat rate: slider to Fast.
    7. Click OK.
    8. Close all windows.

CSI Password Security


To Change the Default Password Policy in Windows Server 2003
Select Domain Security Policy from Administrative Tools.
Click on Security Settings > Account Policies > Password Policy.
Right-click on Passwords must meet complexity requirements.
Click Properties from the context menu.
Do not remove the check from the Define this policy setting checkbox.
Select the Disabled option.
(This will allow less complex passwords)
Click the OK button.

VoIP Conference Call

Placing a Conference Call
Turn a call into a conference call by performing the following steps.
Step 1 - During a call, press the Confrn softkey. This selects a new line
and places the other party to whom you were speaking on hold.
Step 2 - Place a call to another number by using the dial pad to enter the
digits of the other party to include on the conference call.
Step 3 - When the call connects, press Confrn again to add the other
party to the conference call.
Conference Call Tips
• When the conference call initiator disconnects, the conference call is
terminated (if the cdnf_join_enable parameter is set to disabled).
• To place a conference call on hold, press the Hold softkey. The other
parties can not talk among themselves. To avoid disrupting the other
Cirrus Networks, Inc. Page 23 of 36
callers, consider muting the call instead. To mute the call, press the MUTE
button.
• To place a conference call on speakerphone, press the SPEAKER
button. Press the MUTE button to mute the speakerphone. The
conference parties cannot hear you but you can hear them.
• The Cisco IP Phone 7940/7960 only allows three parties in a conference
call.
• Call waiting calls cannot be conferenced in; the conferencing node must
establish both legs of the 3-Way conference.

Pipe Delimited

Export or Save Excel Files with Pipe (or Other) Delimiters Instead of Commas

If you’re working with some awful corporate system that should have been retired in the dark ages, you might have had to produce a file from Excel with some weird delimiters other than comma or tab-delimited to import into the system. Here’s the trick on how to do it.
Naturally, this isn’t the type of article that most people will need to use, hopefully ever—but if you do need to know how to do it, the solution isn’t really obvious at first. 
Exporting Excel Files as Pipe Delimited
For the purposes of this example, we’ll use this silly little Excel file.
image
To save the file as Delimited, you’ll need to click the Office button and choose Save As –> Other Formats.
Then select CSV (Comma delimited)(*.csv) from the drop-down list, and give it a name.
Now here’s where the interesting part happens… Excel by default will use a comma as the delimiter, but if you open up Control Panel –> Region and Language, and then click the Additional settings button on the bottom…
Now look very closely at the “List separator” item, which normally has a comma in the field, but for the purposes of illustration I’ve switched it to a Pipe character.
Once you hit Apply, and then save your Excel file, you’ll notice that your file now has pipe characters as the delimiter.
You’ll probably want to change the List separator back to a comma just in case some other application needs it. 

How to Register a Phone


If a phone is not registered try the following:

First Locate the IP Address on the phone that isn't registered.

Log into the FreePBX and make sure the extensions (password) which is [secret on this list] is set to cirrusXXXX (the XXXX is the phone extension number you are trying to fix) Example: Kandy Bond's would be cirrus11322. 

Then go to the phone's web interface using a WebBrowser which is the IP ADDRESS of the phone. 
-go to ACCOUNT 1 PAGE
-enter admin/cirrus for the user and  password
-click submit
-clicked reboot

The phone should be registered.

McAfee Virus Remover


Download file "MCPR.exe"


Right click and Run as Admin


For more info:

http://www.techtipsgeek.com/how-to-completely-remove-mcafee-products-from-windows-without-formatting/8092/

Follett eBooks

Download either the high school or elementary schools Quick Tips sheets. Note there is a different in the URLs.


Download file "Follett High School.pdf"Download file "Follett Elem Schools.pdf"


Brother 2270DW low toner trick

When the toner light comes on but you still have toner, try this.
This all came from this site: http://www.fixyourownprinter.com/forums/printer/70186

Go to the IP address of the printer in your browser.
Go to Printer settings.
See the Replace Toner at the bottom of the page. Change from Stop to Continue and then Submit.

If the toner light is already blinking on your printer, you might need to reset it.
Please do the following steps to reset the toner sensor.

- Open the front cover and leave open while completing the following steps.
- Turn the printer off.
- Hold the 'go' button (or "start' button) while turning the printer on. All panel lights should be on.
- Release the 'go' button (or "start' button).
- Press the 'go' button (or "start' button) 2 times.
- Pause. All panel lights should be on.
- Press the 'go' button (or "start' button) 5 times.
The toner light should be off. (error may be flashing)
The paper light should be on or flashing.
- Close cover. The ready light should be the only light on.

How to Make Music Play Across Slides in Powerpoint


Powerpoint for Mac 2011: Play audio across slides

  1. Click on Insert -> Audio -> Audio Browser (or Audio from File).
  2. Select which audio track you want to play.
  3. Powerpoint.2011.Insert.Audio
  4. Click and drag Audio Track over.
  5. Click on Audio Icon.
  6. Click on ‘Format Audio’ tab.
  7. Under ‘Start’ select: ‘Play Across Slides.’
  8. PowerPoint.2011.Format.Audio.Toolbar
    It’s that simple. If you want to do this for only a certain number of slides, follow the steps above and then follow the ones below.
  9. Click on the ‘Animations’ tab.
  10. Click on the ‘Reorder’ button.
  11. Powerpoint.2011.Animation.Reorder
  12. Click on the animation you want to change.
  13. Under Media options, change it from ’999′ to however many slides you wish to play the media across.
  14. PowerPoint.2011.Custom.Animation

How to Turn Off Spell Check


To turn off automatic spelling checking and automatic grammar checking, follow these steps, as appropriate for your situation.

Word 2010

  1. Click the File tab, and then click Options
  2. Click Proofing
  3. Click to clear the Check spelling as you type check box. 
  4. Click to clear the Mark grammar as you type check box.

Outlook 2010

  1. Click the File tab, and then click Options
  2. Click Mail , and then click Editor Options
  3. Click to clear the Check spelling as you type check box. 
  4. Click to clear the Mark grammar as you type check box.

PowerPoint 2010, Publisher 2010, and Visio 2010 

  1. Click the File tab, and then click Options
  2. Click Proofing
  3. Click to clear the Check spelling as you type check box. 
  4. Click to clear the Hide spelling errors check box.

Word 2007

  1. Click the Microsoft Office Button
     Microsoft Office Button
    , and then click Word Options
  2. Click Proofing
  3. Click to clear the Check spelling as you type check box. 
  4. Click to clear the Check grammar as you type check box.
Important The Check spelling as you type and Check grammar as you type settings will affect any open documents in Word 2007. If other people use the documents, you may want to notify the people that you made this change.

Outlook 2007

  1. On the Tools menu, click Options
  2. Click the Spelling tab, and then click Spelling and AutoCorrection
  3. Click to clear the Check spelling as you type check box. 
  4. Click to clear the Check grammar as you type check box.

PowerPoint 2007

  1. Click the Microsoft Office Button
     Microsoft Office Button
    , and then click PowerPoint Options
  2. Click Proofing
  3. Click to clear the Hide spelling errors check box. 
  4. Click to clear the Check spelling as you type check box. 

InfoPath 2007, OneNote 2007, Publisher 2007, SharePoint Designer 2007, and Visio 2007

  1. On the Tools menu, click Spelling, and then click Spelling Options
  2. Click to clear the Hide spelling errors check box. 
  3. Click to clear the Check spelling as you type check box. 

Word 2003, Word 2002, and Word 2000

  1. On the Tools menu, click Options, and then click the Spelling & Grammar tab. 
  2. Click to clear the Check spelling as you type check box. 
  3. Click to clear the Check grammar as you type check box.
Important The Check spelling as you type and Check grammar as you type settings will affect any open documents in Word. If other people use the documents, you may want to notify the people that you made this change.

Outlook 2003 and Outlook 2002

  1. Compose a new message.
  2. On the Tools menu, click Options and then click the Spelling & Grammar tab.. 
  3. Click to clear the Check spelling as you type check box. 
  4. Click to clear the Check grammar as you type check box.

PowerPoint 2003, PowerPoint 2002, and PowerPoint 2000

  1. On the Tools menu, click Options, and then click the Spelling and style tab. 
  2. Click to clear the Hide spelling errors check box. 
  3. Click to clear the Check spelling as you type check box. 

Connecting to a Mac Server from a PC

1. Click Start and invoke the Run program.
2. In the Run window, type: \\IP Address of your Mac server\Share Name.
3. You should get a window asking for a user name and password to connect. 

FCMS Deep Freeze

TVEV83N2-9803FQ2J-YRFA3HXM-JYPE5SNS-85HDV67M 

Security Settings in Windows 7


To change security settings in Windows 7, go to Control Panel and type UAC in the search box. Change the user security setting to the lowest bar. Restart for this to take effect. 

*this was used for PC CSI users to write to the C: drive.

End of Year Reports for Elem and MS

Download file "End of Year Reports Directions.docx"

How to Unlock a Grandstream Phone


If the keypad gets locked on a Grandstream phone, hold down the STAR * key for 4 seconds. If it asks for a password, use 123. It may not ask for a password.

Pasting Visible Cells Only in Excel

Click the total break that you want to see in the spreadsheet.
Click Edit>Go To> Special
Click the button beside ‘Visible Cells Only’
Click OK
Back at your spreadsheet, highlight the cells you want to copy.
Then paste in a new spreadsheet.
This is placeholder text for your new blog entry. Replace it with your own.

How to Set Windows 7 to Login Automatically

Here's How:
1. Click on Start and then enter the following command in the search box:
netplwiz
Press the ENTER key.
This command will load the Advanced User Accounts Control Panel applet.
2. In the Users tab, uncheck the box next to Users must enter a user name and password to use this computer.
3. Click on the Apply button at the bottom of the User Accounts window.
4. When the Automatically Log On dialog box appears, enter the user name you wish to automatically login to Windows 7 with. Then enter your account password in the two fields where it's asked.
Click the OK button.
5. Click OK on the User Accounts window to complete the process.
From now on, when your PC starts up, Windows 7 will log on automatically